Healthy Hot Cocoa

Healthy Hot Cocoa

When I was growing up in Vermont, nothing said “winter” like a snow day and a steaming cup of hot cocoa. But as I’ve become more health conscious over the years, the thought of having lots of sugar and milk with a little cocoa powder is no longer as appealing. While cocoa powder has been shown to have powerful antioxidants and a long list of health benefits (For more information about the health benefits of cocoa powder watch this video), unfortunately adding milk has been shown to suppress the health benefits of cocoa powder.  And we all know refined sugar isn’t something we need to add to our diet!

So here’s what I’ve come up with instead. A truly healthy, deeply chocolatey, slightly sweet, hot chocolate that you can enjoy with a smile, knowing that you are giving yourself a treat that is actually treating yourself well.

There are only three ingredients, but all of them have been well thought out. Be sure not to use dutch cocoa powder also known as alkaline cocoa powder. Alkalized cocoa powder has dramatically reduced antioxidant levels. For more information take a look at this study. For the sweetener, I used date molasses which is lower in sugar than other natural sweeteners and retains some of the healthful benefits of dates.

Healthy Hot Cocoa

Serving size 1
Ingredients:
1 Cup Unsweetened Soymilk (or other non-dairy milk)
1 Tablespoon Cocoa Powder (unsweetened and non-alkaline)
2 Teaspoons Date Molasses

Directions:
1. Over a medium low flame warm up the soymilk.
2. When the soymilk starts to steam add the cocoa 
powder and date molasses and whisk all the 
ingredients together until well blended.
3. Pour carefully into a mug and enjoy!

Why exercise is a longterm investment

As an independent personal trainer, Pilates, and Yoga teacher my work is largely to help people learn how best to take care of their bodies through physical exercise, and breathing techniques. Over the years of working with people in this capacity I have noticed that many people seem frustrated by the fact that they have to keep up so much regular care and maintenance. They are annoyed when their body seemingly “fails” them by not always being ache free and perfectly functional. I often hear things such as, “I went to physical therapy, and it got better, but now it bothers me again.” The idea seems to be that all physical issues should be “fixable” and then easily ignored. My experience working with people is that it takes regular, committed, and focused attention to our bodies in order to maintain some semblance of functional movement as the decades continue on. In other words it takes an investment of your resources over a long period of time to work towards longevity and a continued rich quality of life.

The next time you feel frustrated that your body doesn’t run perfectly all the time pause for a moment and consider the following two things:

  1. Our bodies last a long time. Think about the life span of most other animals. While there are exceptions such as the Bowhead Whale which often lives about 200 years, elephants 60 years, and some species of Gorillas living for around 50 years, these examples are not the norm. Humans can live an unusually long time in comparison with other creatures.
  2. If you owned one house for your whole life, you would expect to have to clean, repair, and do other maintenance on the house. Why would you expect that your body wouldn’t also need regular upkeep and care?

If you want to feel good in your body, thereby being able to enjoy life with regular movement, travel, outdoor adventures, dancing, and just being relatively pain-free as the years go by, you need to think in terms of a committed, regular, sustainable, and enjoyable plan for body care.

A well-rounded program includes being aware of your posture, balance, bone density, muscle strength, heart health, joint health, diet, hydration, and mental well-being. It may seem like a lot to think of, but it is your body! However you treat it now, it will pay you back in the short and long-term.

Fortunately, what is good for one part is usually good for another. For example, strength training is good for your muscles, and your bones. Eating fiber is shown to not only improve digestion, but also help with weight management, and heart health. It is never too late to start as even small improvements can make a big difference to quality of life.

The beautiful thing about taking small steps towards a healthy lifestyle is that like any good investment, it grows on itself. When you do something simple, like going for a walk, you feel better, which enables you to have the energy to make a healthier dinner, which could mean a better nights sleep… and so the cycle continues, building on itself to make you feel and look your best.

What Motivates a Fitness Professional?

IMG_0629.JPGSometimes people assume that because I am a personal trainer, yoga, pilates, meditation and barre instructor I am just inherently in good shape, eat healthfully and live life mindfully at all times. It would be wonderful if by teaching others to live healthfully I absorbed the benefits of a good diet, exercise and meditation routine by osmosis. But the truth is that I am just a person like anybody else, and I argue with myself about going to the gym, waking up early to meditate and whether or not to order dessert.

What hope is there if even a personal trainer has to struggle with living a healthy lifestyle? I am here to share with you what motivates me personally to live my life healthfully, and how I think it can help you too. It largely boils down to three key factors, education, community and being a role model.

Inspirational education: As a personal trainer I am constantly reading articles and studies about health and wellness so that I can be up to date on the latest research and be able to provide the best information to my clients and students. While my initial motivation for reading an article may be to educate my self as a professional, it also impacts the way I want to live my life. If I read the article How Exercise Could Lead to a Better Brain, I feel excited about my own workouts as well as my clients. img_2150While I often dig deeper and try to read the studies behind whatever the latest trend may be, much of my research comes from easily accessible and fun to read sources such as the New York Times Well section, Yoga Journal, and even magazines like Shape or Self. There are a lot of studies being done on food, exercise, meditation, and how a healthy lifestyle impacts our whole lives. By reading a few articles a week and maybe sharing them with friends or family you think would be interested, you may find yourself more motivated and excited about making healthy changes in your life.

Community: When I am exercising, and I get to that part where I want to quit, I think of my clients and students. It is my goal to help people exercise safely past their comfort zone and to the point where changes happen in the body on all levels. I would feel embarrassed if  I didn’t practice what I preach.athleta-barre-class

img_1021When my alarm wakes me up at 5:30 am for 30 minutes of Pilate’s stability exercises before my day starts, I think of all the other people in gyms, or on yoga mats throughout the city who got up well before the break of dawn to do something good for themselves. I admit that it was a shock to me when I first learned that people went to the gym at 5 am in this crazy city that never sleeps. But I have since then come to feel inspired by it. On the other side, plenty of my clients and students are not morning people and they share stories about getting home late, and doing their exercises at midnight before falling asleep. My clients and students have taught me that there is always time to prioritize you’re health and that the impacts of making changes in your life does result in real, tangible and lasting changes. Seeing those changes occur in the people who trust and follow my guidance has in turn inspired me to live what I teach every day.

How is this relevant to non fitness pros? I think the real key here is surrounding yourself with people who do the things you want to be doing. Every day I am talking to people who are dedicated to making at least a small commitment to their health and wellness, and this is something you can do without teaching exercise classes. How that looks for you could be very different from someone else. Try joining a walking group. Or start a walking group with some of your colleagues at work. Find a group fitness class where the teacher and students excite you. Hire a personal trainer who takes the time to work with your needs and goals. Take a healthy cooking class. Take a meditation class. The key is to find other like minded people who are working on living the lifestyle you are aspiring too. Social media can also be a great source of healthy-minded people. I love mynewroots.org, thechalkboardmag, ohsheglows, karlytreacy, and well.blog.nytimes. And of course you can follow me on Facebook, Instagram, and Twitter and sign up to receive my email updates.

Be a Role Model: It is my job to lead by example and to practice what I preach, which of course is a big motivation. Why not make it a goal to be an inspiration and example to others? I often see when a client or student of mine makes a big change in their life that it encourages others. Seeing is believing. Maybe you could give someone else courage to show up and try? This doesn’t mean being perfect or having already achieved certain goals. People are encouraged by other people who struggle, persevere and try their best.

What I’m really saying is that as a fitness professional, I am constantly surrounding myself with resources and a community of people who are trying to live healthier lifestyles and it is my job to motivate, educate and inspire them. img_20170128_183045_478While health and wellness may not be your profession, I think that there is a lot that could be recreated by simply reading and sharing information, surrounding yourself with people who are trying to live a meaningful, joyful, and healthy lifestyle, and asking yourself to be the change you want to see.

Morgana Tessler is a Certified Orthopedic Personal Trainer, Yoga, Pilates, Meditation and Barre Instructor based in NYC. Morgana offers private and group fitness sessions. For more information visit www.morgana.nyc FacebookInstagram

Healthy Food & Fitness Workshop Recipes

These delicious recipes are from my recent Healthy Fitness & Food Workshop. Make a bunch of them at the start of the week and have healthy, gourmet, whole foods to eat all weeklong. 20170115_140705


Kale Pesto Spread

I created this recipe after being inspired by the vegan pesto recipe in The Mediterranean Vegan Kitchen by Donna Klein.

INGREDIENTS:

  • 3 cups raw kale, rinsed thoroughly
  • 1/4 cup raw walnuts (lighly toast for a more rich flavor, or use them raw)
  • 2 cloves garlic, chopped and sauteed
  • 3 tablespoons olive oil (use 6 tablespoons to make a pesto sauce for pasta)
  • 1 teaspoon salt or to taste

DIRECTIONS:

Put the kale, walnuts, garlic and salt into a food processor. Blend until smooth, scraping down the sides as needed. Add the olive oil and blend until smooth and well mixed.

Carrot and Grapefruit Salad with Honey and Cardamom

This simple, delicious recipe is a great way to enjoy something sweet while getting in lots of vegetables and fruits.

INGREDIENTS:

  • Grate or spiralize 4 large raw carrots. It is especially beautiful to use multi-colored carrots if available
  • 1 large grapefruit sliced into small bite size pieces
  • 1-2 tablespoons honey
  • 1/8 teaspoon cardomom (freshly ground is preferable)

Toss all the ingredients together and adjust honey and cardamom to taste. This gets better the longer it sits. Also, the juice at the bottom of the bowl is wonderfully sweet, and rich in flavors.

Chia Seed Pudding

This recipe makes a perfect breakfast or desser. Make up a big bowl and store it in the fridge to use throughout the week.

INGREDIENTS:

  • 4 tablespoon chia seeds
  • 1 cup unsweetened non-dairy milk, I prefer soymilk
  • 1 teaspoon vanilla extract (optional)
  • 1/2-1 tablespoon pure maple syrup or other natural sweetener (optional)
  • Fresh or frozen fruit

Mix the chia seeds, milk, vanilla, and maple syrup together and allow to sit overnight or for at least 2 hours. It will be prettier if you add the fruit after, but I usually add it in for the soaking so that it is ready immediately and I can take it to go.

2017-01-14-15-12-36
Any color cauliflower is delicious, but the purple one is especially fun!

Roasted Purple Cauliflower

INGREDIENTS:

  • One large head cauliflower, washed, patted dry, and chopped into florets
  • 2 tablespoons vegetable oil
  • 1/4 teaspoon salt

With your hands, stir the cauliflower in the oil and salt in a large bowl until coated well. Put on a baking dish in the oven around 400 degrees. Let roast for 20 minutes before stirring and shaking the pan. Repeat until the cauliflower have become soft and juicy.

Quinoa Salad w/ Lemon, Avocado, and Pistachios from Vegetable Literacy by Deborah Madison

INGREDIENTS, plus my notes:

  • 2 heaping cups of cooked quinoa (I used red, the recipe calls for black, you can use white or any color. It will not effect taste so much as presentation).
  • 8 ounces or more of greens (such as beet greens, chard, spinach), cooked, drained, and finely chopped. I used an enormous head of chard. It will boil down so don’t worry about putting in too many greens!
  • Grated zest of 1 lemon
  • 3 Tablespoons of olive oil
  • 1/2 teaspoon ground cumin
  • sea salt to taste
  • 10 mint leaves, slivered
  • A heaping Tablespoon of chives
  • 1 Avocado; I used 2 small ones 🙂
  • Crumbled Feta, ricotta salata, or smoked ricotta; I did not include cheese
  • Pistachio nuts, coarsely chopped

DIRECTIONS, plus my notes:

To cook the quinoa, first rinse 1 cup of quinoa under cold water to remove the saponin, which can taste bitter. Boil 2 cups of water in a saucepan, then add a 1/4 teaspoon salt and the quinoa. Lower the heat, cover the pan, and simmer until the liquid is absorbed and the spiral of the germ is visible, 12 to 15 minutes. Let it sit for 5 minutes. If there is still liquid in the pot, but it seems like it’s cooked, drain the water out.

Toss the cooked quinoa with the finely chopped cooked greens, using your fingers to distribute the greens.

To make the vinaigrette, whisk together the lemon zest and juice, oil, cumin, and a pinch of salt. Pour it over the quinoa and greens, add the mint and chives, and toss to coat. Toss in the avocado and nuts, which last in the refrigerator all week without turning brown! Taste for salt and lemon.

Winter Squash Puree with Tahini, Green Onions, and Black Sesame Seeds from Vegetable Literacy, by Deborah Madison

INGREDIENTS, plus my notes:

  • 2 Cups cooked winter squash. The squash can be cooked in advance or the day of. I roasted a large squash in the oven at 400 degrees for about 30-40 minutes. It made 3 cups squash, so I used it all
  • 1/4 Cup tahini
  • Sea salt
  • 2 teaspoons olive oil
  • 1 small bunch thin green onions, including a bit of the greens, thinly sliced (also known as scallions)
  • 1 tablespoon sesame oil
  • 2 teaspoons black sesame seeds, toasted in a dry skillet until fragrant, to finish. I did not toast them, and you can make this without the seeds, or with white sesame seeds

DIRECTIONS, plus my notes:

Heat the cooked squash in a saucepan over medium heat if it’s cold. Stir in the tahini and season to taste with salt.

While the squash is warming, heat the olive oil in a small skillet. When the oil is hot, add the green onions and cook to wilt slightly, about 2 minutes. Stir them into the squash and then stir in the sesame oil. Finish with the sesame seeds.

2017-01-14-13-13-02Green Lentils with Roasted Beets and Lemon from Vegetarian Cooking for Everyone by Deborah Madison

INGREDIENTS, plus my notes:

  • 5 beets, about 1 pound
  • 1 teaspoon olive oil
  • 1 cup french green lentils, you could use another kind of lentils
  • 1 carrot, finely diced
  • 1/2 small onion finely diced
  • aromatics: 1 bay leaf, 4 parsley branches, 2 thyme sprigs
  • 1 preserved lemon, or 2 teaspoons lemon zest, I used the lemon zest
  • 1/3 cup chopped parsley
  • 2 tablespoons chopped mint, plus mint for garnish
  • Lemon Vinaigrette (see below for recipe)

DIRECTIONS, plus my notes:

Preheat the oven to 350 degrees. Peel the beets and cut them into small cubes. Toss the cubed beets with the oil, season with salt and pepper, and bake on a sheet pan until tender, about 35 minutes, stirring once or twice. Meanwhile, put the lentils in a pan with water to cover, add the carrot, onion, aromatics, and 1/2 teaspoon salt and bring to a boil. Lower the heat and simmer until tender but still a little firm, about 25 minutes. Drain well.

Toss the lentils with the roasted beets and the vinaigrette, the lemon zest, parsley and mint.

Lemon Vinaigrette from Vegetarian Cooking for Everyone by Deborah Madison

INGREDIENTS:

  • 2 tablespoons fresh lemon juice
  • 1 teaspoon finely chopped lemon zest
  • salt and freshly milled pepper, I used regular black pepper
  • 1 shallot
  • 5 tablespoons extra virgin olive oil or to taste

DIRECTIONS, plus my notes: 

Combine the lemon juice, zest, 1/4 teaspoon salt, and shallot in a small bowl. Let stand for 15 minutes, then whisk in the oil and season with a little pepper to taste. I don’t think that I let it sit for 15 minutes.

2017-01-14-15-18-52
Don’t worry! You can put the red pepper in the broiler instead!

Muhammara (Red Pepper and Walnut Spread)

My sister in-law, Sammi, made it as an appetizer at a Christmas party and I think I probably ate the majority of it by myself!

When I made it for the workshop I was out of bread crumbs, so I threw in a small amount of toasted oatmeal. While the flavor was a little different, it was delicious and the texture came out just right.

http://cooking.nytimes.com/recipes/1017492-muhammara-red-pepper-and-walnut-spread

The Life Changing Loaf of Bread from the blog My New Roots

The Bread! I think this nut bread may have been the biggest hit of the workshop. It is a recent new staple in my kitchen thanks again to my sister-in law, Sammi. It takes a few minutes to throw all the ingredients together, soak overnight (or during the day) and then cook in the oven for 40 minutes. It is really easy. The only tricky thing is that you need psyllium powder to hold it together. You can find this at a supplement store like GNC.

The recipe is from a wonderful blog called My New Roots, which I strongly recommend in general. https://www.mynewroots.org/site/2013/02/the-life-changing-loaf-of-bread/

Morgana Tessler is a Certified Orthopedic Personal Trainer, Yoga, Pilates, Meditation and Barre Instructor based in NYC. Morgana offers private and group fitness sessions. For more information visit www.morgana.nyc FacebookInstagram


Healthy Holiday Cookies!

Okay, so maybe the words “healthy” and “cookies” shouldn’t go together, but these cookies are what I like to call a healthy indulgence. For a rich, flavorful, and festive cookie with NO refined flours/sugars, dairy or eggs, made with whole real foods, look no further.

2016-12-19-15-23-21
Dairy and egg free, all-natural cookies made with whole wheat pastry flour, honey/maple syrup, and coconut oil. Cashew cream icing and pomegranate seeds make these wholesome cookies decadent and healthful!

I found the recipe at Kim’s Cravings (I used half the amount of cinnamon recommended) and added pomegranate seeds instead of sprinkles!

Morgana Tessler is a Certified Orthopedic Personal Trainer, Yoga, Pilates, Meditation and Barre Instructor based in NYC. Morgana offers private and group fitness sessions. For more information visit www.morgana.nyc FacebookInstagram


Gentle Yoga Post-Feast

Indulging in a delicious meal with family and friends is one of the great joys of the holiday season. Starting with the Thanksgiving feast and going all through the holiday season, it can be a time of enthusiastic eating and drinking. While this is often a pleasure and something many people look forward to all year, sometimes it can be too much for the digestive system and we wind up feeling bloated, and uneasy in the stomach.

Here is a short easy series of yoga poses to help relieve digestive discomfort post-feast. These yoga poses were selected to help massage your internal organs that are associated with the digestive tract. By stimulating the digestive muscles you increase blood flow and movement through your body and help to reduce discomfort and restore energy.

img_1990

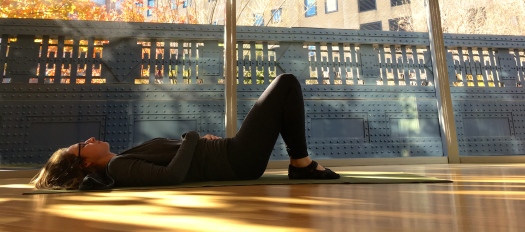
Begin by laying on your back with your knees bent, and feet on the floor. Place your hands onto your abdomen and feel your breath slowly rise and fall. Breathe slowly for a minimum of 1 minute, or as long as it feels comfortable. Slow, calm breathing allows your body to relax and get to work on digesting all that food.IMG_1940.JPG

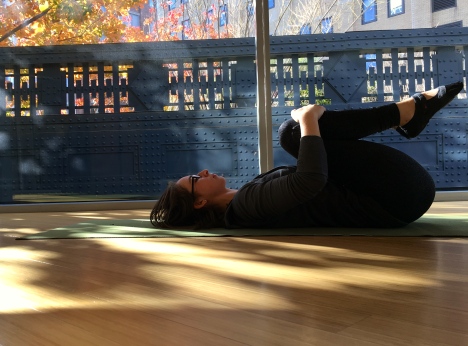
Bring your knees into your chest and give your shins a gentle squeeze. Hold this stretch comfortably for 5-15 slow deep breaths.

IMG_1958.JPG

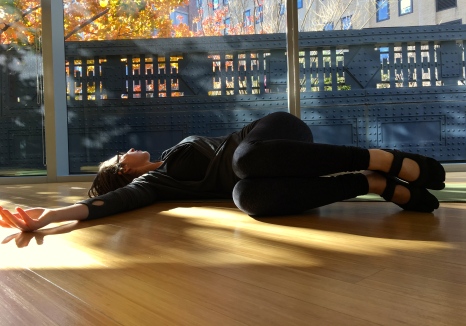
Allow your knees to go over to the right while opening your arms to either side and turning your head to the left. Breath in the twist for 5-15 breaths and then twist the knees over to the left and repeat on the other side. Twisting gently can be beneficial for getting the digestive tract moving. To modify place a pillow or block between your knees to put less of a stretch on your lower back. This is also a good stretch for the neck, shoulders, spine, and hips.

This next series should be taken as a slow moving sequence. Start on your hands and knees. On your inhale, look up towards the ceiling allowing your abdomen to stretch and open. On your exhale, thread an arm underneath your chest and come to lay on your shoulder. Pause in the stretch and breath for 2-4 slow deep breaths. On your next inhale come back to your hands and knees, and look up towards the ceiling. Exhale and thread the other arm underneath. To modify, put a large pillow or yoga block under your head. In addition to aiding digestion, this is also a pleasant stretch for the neck, shoulders, spine and hips.

And last, but not least, take a walk! Walk slowly after a big meal to help get the food moving and ease any post meal discomfort.img_0170Morgana Tessler is a Certified Orthopedic Personal Trainer, Yoga, Pilates, Meditation and Barre Instructor based in NYC. Morgana offers private and group fitness sessions. For more information visit www.morgana.nyc FacebookInstagram

Tips for eating a more plant-based diet

Fruits and Vegetables

To be clear, I am not a nutritionist. The following information is based on my own personal experience of transitioning to an animal free diet as well as stories from friends, and clients. As a Personal Trainer, Yoga, Pilates and Barre Instructor based in New York City I think a lot about health, both for myself, my clients and the world at large. I see the issues of people’s physical and mental health, as intertwined with each other and the other people and animals that live on this planet. Eating a more plant based (or exclusively plant-based) diet is one of the simplest and most effective ways to dramatically improve our own personal health while having a big impact on climate change and other global economic and social issues. It is a true win win choice.

The Environment: According to a 2006 report by the United Nations Food and Agriculture Organization (FAO), our diets and, specifically, the meat in them cause more greenhouse gases carbon dioxide (CO2), methane, nitrous oxide, and the like to enter the atmosphere than either transportation or industry. Meaning you can make more of an impact by cutting out meat than getting rid of your car! And this is not even factoring in the enormous amount of land, water, fertilizers and antibiotics that get used to produce meat, dairy and eggs.

Health: In terms of health benefits, a well-planned plant-based diet is rich in protein, iron, calcium and other essential vitamins and minerals. Furthermore, the sources of these nutrients tend to be low in saturated fat, high in fibre and rich in antioxidants, helping to reduce some of the major health issues like obesity, heart disease, diabetes and cancer. Studies have also shown that vegans and vegetarians tend to have lower BMI’s and smaller waistlines.

With all the studies and information available about the enormous benefits of adopting a more plant based diet the truth of the matter is that it is very hard for many people who are accustomed to eating meat, dairy and eggs. If you feel overwhelmed by making a change or don’t know where to begin here are a few simple and easy ways to begin making a change in your diet. I often suggest to people that if you’re not interested in becoming strictly vegan or even vegetarian, try being an “omnivore making vegan choices”. This means recognizing that even a small choice can have an impact.

Tip 1: Focus on adding not subtracting

For many people it is easier to add more foods than to eliminate or reduce the ones they like and/or are used to. For example, if you’re planning on having a chicken sandwich for lunch, add a large salad to your meal as well. It will prevent you from feeling deprived and have the immediate effect of adding nutritious and tasty items to your meal. The eventual goal is that you will eat enough fruits, veggies, whole grains and nuts that you will feel more full and as a result start to eat less meat, dairy and eggs.

img_1877

Tip 2: Focus on the plant-based foods you already like

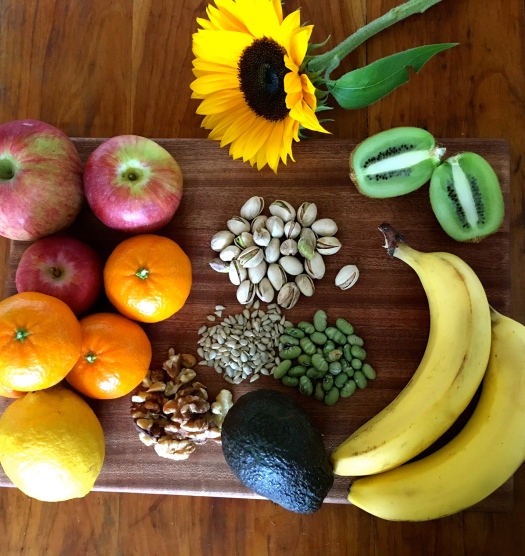
Rather than thinking of this new shift as a time to eat your least favorite veggies, focus on adding the plants you already know and love. Fruit and nuts are usually the most obvious easy choice in this case. By increasing your fruit and nut intake you are adding loads of fiber, vitamins and minerals to your diet while enjoying yourself.

Tip 3: A chance to try something new

A friend of mine recently told me that becoming vegetarian meant she tried many new foods she would never have tried before. While dining out at a restaurant she usually went for the same types of things, but with meat no longer an option she branched out and learned she loved other items on the menu.

Tip 4: Go to ethnic restaurants

Indian, Thai, Chinese, Mexican and Japanese to name a few, are often easy to make vegetarian or vegan choices. The foods are usually rich, flavorful and spicy without relying heavily on meat or dairy for flavor.

Tip 5: Tastes can change

One of the biggest things I learned for myself when I completely eliminated all animal products from my diet is that my tastes changed. Things I previously didn’t like as much started to taste really good. We often think that our taste buds are set and permanent, but they can learn to acquire new flavors and in some cases even grow to not like the old flavors any more!

dscf5021Tip 6: When in doubt add Avocado

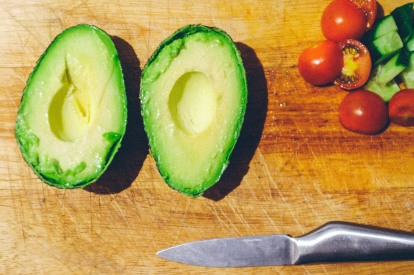
Anytime I feel like I want cheese, I add avocado and find it far more enjoyable and satisfying. Coconut is another great way to satisfy a desire for something creamy, fatty and delicious.

Try a quick easy dairy and egg free cookie recipe!

My favorite cookbooks:

Vegetarian Cooking for Everyone by Deborah Madison is my number one go to cookbook. I have cooked many of the recipes from this book and they always come out amazing even on the first try.

The Oh She Glows Cookbook by Angela Liddon is beautifully illustrated and inspires a wholesome clean diet that is full of delicious and fun meals.

THUG KITCHEN eat like you give a f**k is a #1 New York Times Bestseller. While full of raunchy ridiculous jokes this book actually has a lot of great recipes and the instructions are no-nonsense and easy to follow.

Morgana Tessler is a Certified Orthopedic Personal Trainer, Yoga, Pilates, Meditation and Barre Instructor based in NYC. Morgana offers private and group fitness sessions. For more information visit www.morgana.nyc FacebookInstagram


Good Posture in 8 Moves a Day

Posture is one of the most important aspects of physical health and overall attractiveness, but for some reason it is often overlooked. This short, simple series, requiring little to no equipment was created by Morgana Mellett, a Personal Trainer, Yoga, Pilates, and Barre instructor based in NYC for the recently published health and wellness book, THRIVE. This series will help you focus on each part of your body to improve posture and awareness. Do the series as often as possible, aiming for once a day.

Equipment:

  • Mat
  • Chair
  • Countertop to hold onto
  • Yoga strap or belt (optional)
  • Yoga block (optional)
  • Attire: Comfortable clothing that you can move in. All exercises are intended to be performed barefoot.

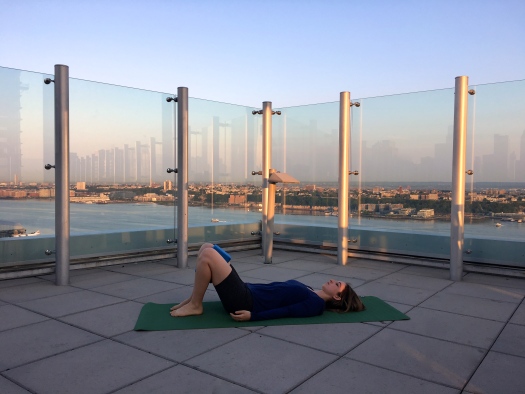
Relaxation Pose
IMG_0979

Benefits: By placing the spine and pelvis in a relaxed, neutral position and allowing your breathing to deepen, you encourage your body to relax and release patterns of tension and poor posture. The relaxation pose cleans the slate in preparation for developing postural awareness.

Set-up: Rest on a mat facing up with knees bent, feet on the mat (parallel and hip-width distance apart), and arms resting comfortably by your side.

Movement: Allow the eyes to become heavy and/or closed. Focus on your breath moving slowly in and out of your body. Scan your body for places of tension or discomfort. Send your breath into these areas, exhaling the tension out of the body.

Modifications: If the knees want to collapse inwards, place a yoga block between the thighs to keep them parallel and hip-width distance apart. Rest your hands comfortably on your chest or abdomen if preferred.

Repetitions: Remain in the pose for at least 1 minute, and try to work toward holding the pose for 5 to 10 minutes.

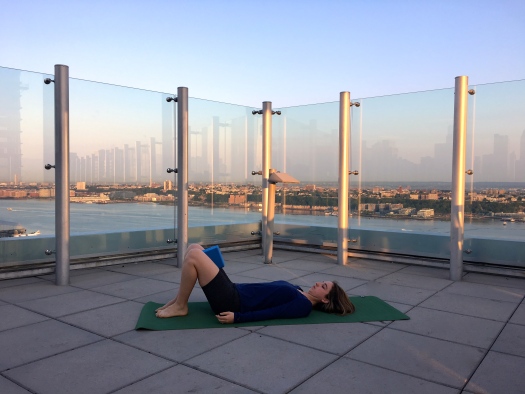
Neck strengthener
IMG_0988

Benefits: This exercise strengthens the muscles of the neck and addresses your tendency to stick the chin forward when you are texting, eating, washing dishes or engaged in other daily activities.

Set-up: Rest on the mat facing up with knees bent, feet on the mat (parallel and hip-width distance apart), and arms comfortably by your side.

Movement: Press the back of your head into the floor slightly, tucking in your chin. Feel the muscles in the front of your neck engage. Keeping your chin slightly tucked, lift your head off the floor only enough to slip a piece of paper under the back of your head. Do not try to lift your head high; the goal is for your head to barely hover above the floor.

Repetitions: 10 repetitions for 5 seconds each. Gradually build up to 10 seconds.

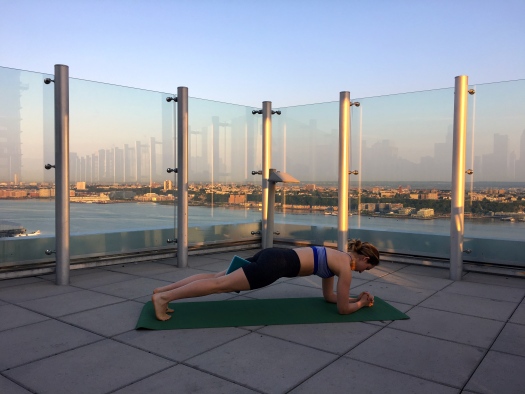
Abdominals/Plank
IMG_1021

Benefits: This exercise strengthens and engages the deepest abdominal muscles for improved postural and lower back support.

Set-up: Lie on floor facing down, propped up on your forearms.

Movement: Tuck your toes, pull your belly button into your spine, and keep it engaged throughout the exercise. Press into your forearms, and lift your body off the floor into a straight plank position. Engage the muscles of your core, thighs, and glutes, and press into your forearms. Check that your hips are in line with your head and have not gone upward or sagged to the the floor.

Modifications: To make this position less challenging keep your knees on the ground. Add a block between the thighs to help engage the pelvic floor and inner thigh muscles.

Repetitions: Hold the plank position for 10 seconds, rest, and repeat 6 times. Eventually build up to holding the plank position for a full minute.

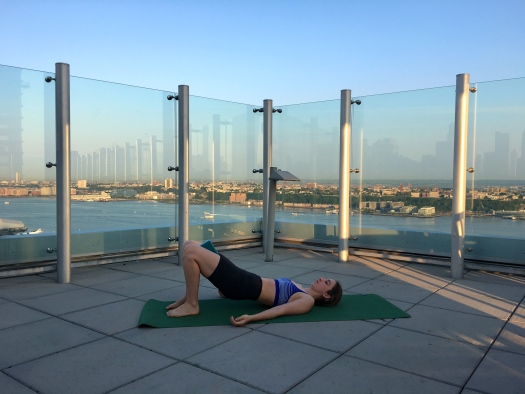
Glute Bridges
IMG_1160

Benefits: This exercise strengthens the muscles in the back of your hips and thighs that support standing, walking, and other physical activities.

Set-up: Rest on the floor facing up with your knees bent, feet on the floor (parallel and hip-width distance apart), arms by your side, and your palms pressed gently into the floor.

Movement: Pull your belly button in, and press your lower back into the mat. Engage your buttocks and inner thighs. Lift your hips a few inches off the floor, continuing to engage the muscles of the glutes, hamstrings, inner thighs and abdominals. Do not press your hips all the way up, if you do, you will not engage the targeted muscles. Roll down through the spine, lengthening out the lower back until you return to a relaxed spine position.

Modifications: Place a block between your thighs to keep your feet and legs parallel and hip-width distance apart. To make the exercise more challenging, reach one foot forward without shifting or tilting.

Repetitions: Repeat 10 times, holding for 5 seconds at the top, and rolling slowly and smoothly through the spine to go up and down.

Back Extension


Benefits: This exercise strengthens the upper back and reverses the forward rounding posture common to everyday activities.

Set-up: Lie on your chest, bring your legs together, and extend your arms out to the side with your palms facing down.

Movement: Pull your bellybutton up and into your spine and keep it there to protect your lower back. Press your hands into the floor, and lift your face, neck, and upper back slightly off the floor. Lift your hands off the floor. Focus on engaging your upper middle back, and keeping your abdominals engaged. Keep the chin tucked so that your neck is in line with your spine.

Modifications: If this bothers your lower back, try pulling your belly button in more deeply and open the legs slightly apart. To make the exercise more challenging, add holding a light weight in both hands.

Repetitions: Hold position for 4 seconds. Repeat 10 times.

Shoulders/Chest Opener


Benefits: This exercise strengthens the muscles of the upper back and opens the chest, reverses the forward rounding posture common to everyday activities, and opens the front of the shoulders and chest.

Set-up: Stand or sit with feet slightly wider than hip-width distance apart, and clasp your hands behind your back.

Movement: Roll your shoulders up and back. Press your shoulder-blades together and down your back until you feel the front of your chest opening.

Modifications: Join your palms together if you can. If your shoulders are tight and this is not possible, interlace your fingers, or use a yoga strap.

Repetitions: Hold the position for 10 seconds. Repeat 5 times or throughout the day.

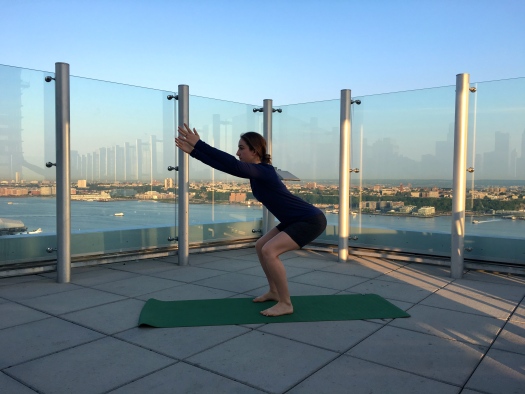
Squats
IMG_1141

Benefits: This exercise strengthens the muscles responsible for healthy sitting and standing postures.

Set-up: Sit on a chair with hips, knees and feet flexed at a 90-degree angle. Be sure you can comfortably sit with your feet planted on the floor. Your feet should be parallel and hip-width distance apart.

Movement: Lean forward by folding at the hips. Look ahead and slightly upwards, keeping your spine flat. Pull your belly button into your spine, and press your feet into the ground to come up into a standing position. Go through the same movements in reverse to sit back down on the chair. Make sure your knees are tracking over your toes and you are pressing into your feet, engaging the thighs, glutes, and abdominals, and maintaining a straight, neutral spine.

Modifications: If the movement is difficult, reach your arms forward, or use a solid object (e.g., a countertop) to facilitate the movement.

Repetitions: Repeat slowly for 10 times, and mindfully go through these same motions any time you sit down or stand up from the seated position.

Feet Rocks


Benefits: This exercise strengthens your feet and ankles and facilitates healthier postural alignment.

Set-up: Stand with your feet parallel and hip-width distance apart, hold onto a countertop.

Movement: Pull your belly button into your spine, open up your chest, and gently engage your upper middle back. Check to see that your neck is in line with your spine and that your gaze is directly forward. Rock back and forth, shifting your weight backward onto your heels with your toes lifted, then forward onto the balls of your feet with your heels lifted.

Modifications: Make the rocking motion smaller or bigger, depending on what feels more comfortable to you.

Repetitions: Repeat 10 times, back and forth.

This series was originally published in THRIVE: An environmentally conscious lifestyle guide to better health and true wealth by K. Chayne

Morgana Tessler is a Certified Orthopedic Personal Trainer, Yoga, Pilates, Meditation and Barre Instructor based in NYC. Morgana offers private and group fitness sessions. For more information visit www.morgana.nyc FacebookInstagram