How prenatal yoga can benefit your pregnancy

Photo by Ironside Photography / Stephen Ironside.

Changes during pregnancy that effect exercise

Finding ways to stay active can be challenging when you’re pregnant. This isn’t just because you feel heavier and need more rest. The changes in your body affect your ability to exercise. Prenatal yoga is a great way to keep moving, breathing, and staying connected to your changing body.

When a woman is pregnant, her heart beats faster, her blood volume increases, a hormone called relaxin causes ligament laxity, and her balance eventually suffers. The change in hormones doesn’t help either. These developments affect every pregnant person’s ability to exercise, no matter how active they may have been before.

While there are a handful of activities that help pregnant women keep moving and feel better, prenatal yoga is one of the best. Not only will it ensure you’re staying healthy, but it can also help prepare your body for labor and so much more.

There are many benefits to practicing prenatal yoga.  

Improves sleep

One thing that can seem impossible during pregnancy is finding the ability to relax and rest. Prenatal yoga is one way to encourage your body to wind down and improve sleep quality.

Lowers pain levels

Prenatal yoga helps tone the muscles in your body. According to Parents, building and maintaining this will help minimize the aches and pains that come with pregnancy. This will also help your body heal after delivery regardless of whether you have a c-section or vaginal delivery.

Helps with labor 

That’s right! Prenatal yoga can help ease the process of labor. Part of this comes from the decrease in stress and anxiety that yoga provides. These feelings are normal, especially during childbirth, so having a practice like prenatal yoga under your belt can help control these emotions when the time comes. 

There is a range of breathing techniques taught to expecting parents before labor. Yoga is a calming practice that teaches breath regulation and mindful breathing. There is a clear connection here. If you spend the next few months practicing prenatal yoga, you will learn about breathing and how to control it during intense times like labor. 

The labor benefits that result from prenatal yoga go beyond that. According to Mayo Clinic, prenatal yoga increases the strength and flexibility of the muscles used in childbirth. Practicing prenatal yoga will improve the endurance of these much-needed muscles. 

Promotes the health of your baby 

Studies have found a link between yoga and reducing the risk of pregnancy complications. Not only that, but prenatal yoga can help you connect with your baby. As you become more in tune with your body and the life growing within, the connection you have with your baby will grow. Through prenatal yoga, you will receive moments to focus on the baby, which is a true gift. 

If you are considering taking up prenatal yoga, be sure to seek instruction from an educated instructor and tell them about your pregnancy. This will help ensure any unique needs you have are met. When done right, the many benefits of practicing prenatal yoga will help as you navigate your pregnancy journey. 

Restorative Yoga

restorative yoga for women

The Impact of a Restorative Yoga Practice

Improve your stress response

Though restorative yoga poses often feel like “nothing”, it is the opportunity for release and relaxation that make these poses so powerful. By letting go of tension and releasing into restorative postures you’re strengthening your stress response. The practice of repeatedly calming the body and returning to a resting state activates our parasympathetic nervous system. This can improve our over-all ability to return back to baseline through day to day ups and downs.

Improve digestion

Down regulating actions like relaxing the muscles and breathing deeply stimulate the parasympathetic nervous system allowing for more efficient and comfortable digestion. Certain postures can encourage general mobility and circulation in the GI tract.

Check out Morgana’s yoga for digestion series. Great to do after a big meal or to incorporate into your daily practice for digestive health.

Get better sleep

There is a wide spectrum of sleep disturbances, from snoring to insomnia. Even an occasional yoga practice has been shown to help people get a better nights sleep. Some scientists suggest this could have to do with mindfulness, a major component of a yoga practice, and the connection between states of mindfulness and increased melatonin levels. Another study done in 2014 showed that a gentle yoga practice improved sleep for pregnant women. For more information on yoga’s role in better more restful sleep check out this article from Sleep Foundation.

seniors doing restorative yoga

Prop Substitutions

props for restorative yoga

As you dive into your restorative yoga practice, you may find many poses suggesting the use of props. Bolsters, blocks, straps and blankets are great if you have them on hand. However most props can be substituted for items you may already have around the house. Here are some suggestions:

Yoga Block: A large book with thin blanket on top can be placed under hips or shoulders

Strap: A long towel, scarf, or belt made of a soft material can be used as long as the exercise does not require the strap to be fastened.

Bolster: Pillows (or a stack of them), couch cushions, blanket or towel rolled length-wise can all work in place of a bolster.

Blanket:

Experiment! Try stacking and layering your props to achieve the desired effect. Remember that your comfort is the top priority in restorative poses, sometimes it will take a few tries to find the right position!


Some more resources to get your restorative yoga practice started:

Morgana’s Restorative Yoga Series

This great article from Yoga Journal discusses why you need a restorative yoga practice this winter.

Three reasons to exercise today

woman stretching on ground

1. Exercise releases dopamine.

As we age we lose up to 13% of our dopamine receptors. Exercise can prevent this decline. An article for the The Greater Good Science Center at UC Berkeley outlines how exercise can reshape our brain’s reward systems to circulate more dopamine and have more available dopamine receptors. Meaning, moving our bodies can make us more sensitive to joy. A regular physical practice of any kind can help to combat depression and increase motivation in all aspects of your life.

2. Exercise boosts the immune system.

Restorative movement like yoga and pilates can be a powerful tool in reducing stress and strengthening your bodies natural defenses. Breath work conditions our respiratory system, stretching and strengthening cleanses and tones our vital organs. To read more about how exercise is an excellent tool in boosting our immune system check out our January blog post Boost your immune system with yoga and food.

woman wearing white sleeveless top

3. Exercise improves learning and memory.

Exercise builds more than physical strength and balance. This article discusses recent studies that have been done investigating the hormone Irisin, which is released during physical activity, and its connection to improved cognitive function. Exercise not only conditions our bodies, but also our brains.

Engaging in physical challenges (big and small) allows us to access neuroplasticity. Neuroplasticity helps us learn and adapt to stress and challenges far beyond our workout. For more information about why exercise is a great tool for building cognitive function check out the podcast below.

4. Get moving!

If you’re interested in incorporating more movement into your life, reach out for a complimentary consultation, or check out my live online group classes including Yoga and Pilates, and a diastasis safe full body workout.

Boost your immune system with yoga and food

There is no better time to bolster your immune system! Immunity can be cultivated through many different parts of your life. This post is meant to provide some quick inspiration of immune boosting techniques you can incorporate easily into your week.

Moving for Immunity
immune system yoga

There are many factors contributing to our immune health. Managing stress is a major contributor. Restorative movement like yoga and Pilates can be a powerful tool in reducing stress and strengthening your body’s natural defenses. This article gives a concise explanation of how a movement practice like yoga can benefit ones circulation, muscles and joints and overall immune health through postures breathing exercises.

If you’re interested in incorporating yoga and Pilates into your weekly movement practice I’d like to invite you to join me to my online Yoga and Pilates class every Sunday at 10 AM (est). For more information click the button below

Eating for Immunity
food healthy garden agriculture

Supplements like Vitamin D and zinc aid the adaptive capacity of the immune system. Many foods contain these vitamins and others which can boost our immunity. Foods like citrus, dark green brassicas like broccoli and kale, ginger and garlic can be great tools in building your immune system.

Research has found that beta glucan is another edible immune booster. Foods containing beta-glucans activate your immune system and better prepare your body to combat invaders and adapt to a changing environment

Beta-glucans can be found in a variety of foods. Whole grains like oats, barley, and whole wheat flour, seaweed, culinary mushrooms like Shiitake and Oyster mushrooms, and medicinal mushrooms like Turkey Tail and Reishi.

ceramic cup of tea with fresh lemon

Lemon Ginger Tea

Bring a pot of water to a boil.

Thinly slice lemon and ginger, steep 5-10 minutes.

Strain and pour into your mug, add honey if you’d like!

enjoy!

Restorative Yoga

Ease into the New Year on a relaxing and rejuvenating note. Often we try to start the New Year off with grand ambitions. But if you woke up today feeling at best a little tired, from the festivities and cold weather, try this enjoyable restorative yoga series.


Gentle Yoga Post-Feast

Indulging in a delicious meal with family and friends is one of the great joys of the holiday season. Starting with the Thanksgiving feast and going all through the holiday season, it can be a time of enthusiastic eating and drinking. While this is often a pleasure and something many people look forward to all year, sometimes it can be too much for the digestive system and we wind up feeling bloated, and uneasy in the stomach.

Here is a short easy series of yoga poses to help relieve digestive discomfort post-feast. These yoga poses were selected to help massage your internal organs that are associated with the digestive tract. By stimulating the digestive muscles you increase blood flow and movement through your body and help to reduce discomfort and restore energy.

img_1990

Begin by laying on your back with your knees bent, and feet on the floor. Place your hands onto your abdomen and feel your breath slowly rise and fall. Breathe slowly for a minimum of 1 minute, or as long as it feels comfortable. Slow, calm breathing allows your body to relax and get to work on digesting all that food.IMG_1940.JPG

Bring your knees into your chest and give your shins a gentle squeeze. Hold this stretch comfortably for 5-15 slow deep breaths.

IMG_1958.JPG

Allow your knees to go over to the right while opening your arms to either side and turning your head to the left. Breath in the twist for 5-15 breaths and then twist the knees over to the left and repeat on the other side. Twisting gently can be beneficial for getting the digestive tract moving. To modify place a pillow or block between your knees to put less of a stretch on your lower back. This is also a good stretch for the neck, shoulders, spine, and hips.

This next series should be taken as a slow moving sequence. Start on your hands and knees. On your inhale, look up towards the ceiling allowing your abdomen to stretch and open. On your exhale, thread an arm underneath your chest and come to lay on your shoulder. Pause in the stretch and breath for 2-4 slow deep breaths. On your next inhale come back to your hands and knees, and look up towards the ceiling. Exhale and thread the other arm underneath. To modify, put a large pillow or yoga block under your head. In addition to aiding digestion, this is also a pleasant stretch for the neck, shoulders, spine and hips.

And last, but not least, take a walk! Walk slowly after a big meal to help get the food moving and ease any post meal discomfort.img_0170Morgana Tessler is a Certified Orthopedic Personal Trainer, Yoga, Pilates, Meditation and Barre Instructor based in NYC. Morgana offers private and group fitness sessions. For more information visit www.morgana.nyc FacebookInstagram

Good Posture in 8 Moves a Day

Posture is one of the most important aspects of physical health and overall attractiveness, but for some reason it is often overlooked. This short, simple series, requiring little to no equipment was created by Morgana Mellett, a Personal Trainer, Yoga, Pilates, and Barre instructor based in NYC for the recently published health and wellness book, THRIVE. This series will help you focus on each part of your body to improve posture and awareness. Do the series as often as possible, aiming for once a day.

Equipment:

  • Mat
  • Chair
  • Countertop to hold onto
  • Yoga strap or belt (optional)
  • Yoga block (optional)
  • Attire: Comfortable clothing that you can move in. All exercises are intended to be performed barefoot.
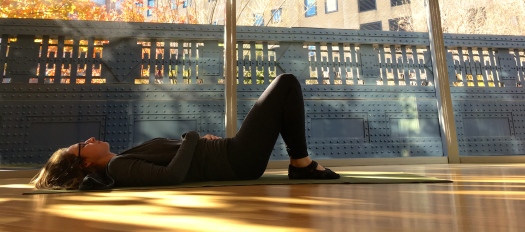
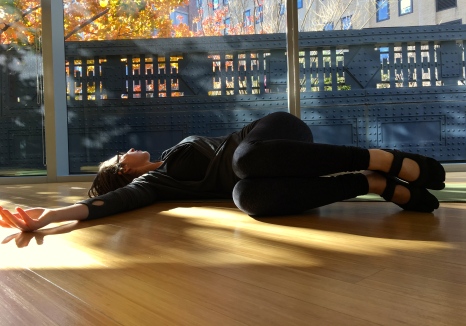
Relaxation Pose

IMG_0979

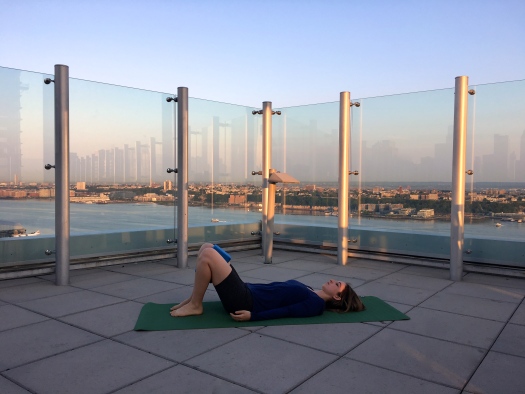
Benefits: By placing the spine and pelvis in a relaxed, neutral position and allowing your breathing to deepen, you encourage your body to relax and release patterns of tension and poor posture. The relaxation pose cleans the slate in preparation for developing postural awareness.

Set-up: Rest on a mat facing up with knees bent, feet on the mat (parallel and hip-width distance apart), and arms resting comfortably by your side.

Movement: Allow the eyes to become heavy and/or closed. Focus on your breath moving slowly in and out of your body. Scan your body for places of tension or discomfort. Send your breath into these areas, exhaling the tension out of the body.

Modifications: If the knees want to collapse inwards, place a yoga block between the thighs to keep them parallel and hip-width distance apart. Rest your hands comfortably on your chest or abdomen if preferred.

Repetitions: Remain in the pose for at least 1 minute, and try to work toward holding the pose for 5 to 10 minutes.
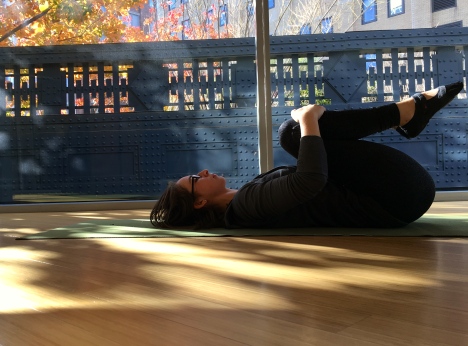
Neck strengthener

IMG_0988

Benefits: This exercise strengthens the muscles of the neck and addresses your tendency to stick the chin forward when you are texting, eating, washing dishes or engaged in other daily activities.

Set-up: Rest on the mat facing up with knees bent, feet on the mat (parallel and hip-width distance apart), and arms comfortably by your side.

Movement: Press the back of your head into the floor slightly, tucking in your chin. Feel the muscles in the front of your neck engage. Keeping your chin slightly tucked, lift your head off the floor only enough to slip a piece of paper under the back of your head. Do not try to lift your head high; the goal is for your head to barely hover above the floor.

Repetitions: 10 repetitions for 5 seconds each. Gradually build up to 10 seconds.

Abdominals/Plank

IMG_1021

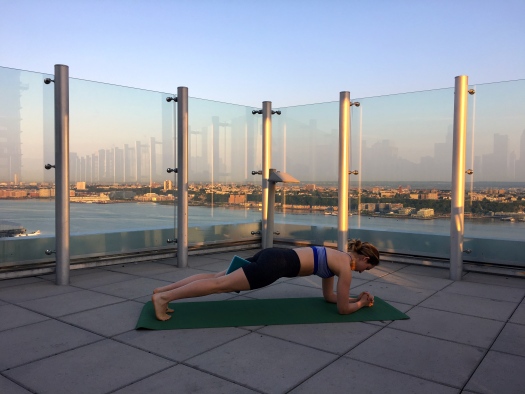
Benefits: This exercise strengthens and engages the deepest abdominal muscles for improved postural and lower back support.

Set-up: Lie on floor facing down, propped up on your forearms.

Movement: Tuck your toes, pull your belly button into your spine, and keep it engaged throughout the exercise. Press into your forearms, and lift your body off the floor into a straight plank position. Engage the muscles of your core, thighs, and glutes, and press into your forearms. Check that your hips are in line with your head and have not gone upward or sagged to the the floor.

Modifications: To make this position less challenging keep your knees on the ground. Add a block between the thighs to help engage the pelvic floor and inner thigh muscles.

Repetitions: Hold the plank position for 10 seconds, rest, and repeat 6 times. Eventually build up to holding the plank position for a full minute.
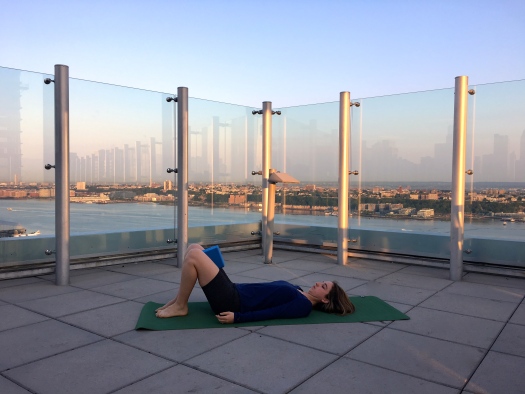
Glute Bridges

IMG_1160

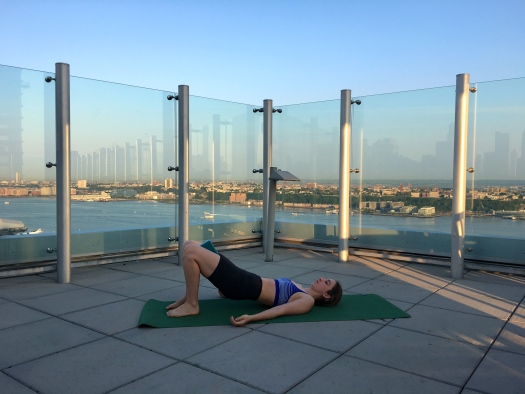
Benefits: This exercise strengthens the muscles in the back of your hips and thighs that support standing, walking, and other physical activities.

Set-up: Rest on the floor facing up with your knees bent, feet on the floor (parallel and hip-width distance apart), arms by your side, and your palms pressed gently into the floor.

Movement: Pull your belly button in, and press your lower back into the mat. Engage your buttocks and inner thighs. Lift your hips a few inches off the floor, continuing to engage the muscles of the glutes, hamstrings, inner thighs and abdominals. Do not press your hips all the way up, if you do, you will not engage the targeted muscles. Roll down through the spine, lengthening out the lower back until you return to a relaxed spine position.

Modifications: Place a block between your thighs to keep your feet and legs parallel and hip-width distance apart. To make the exercise more challenging, reach one foot forward without shifting or tilting.

Repetitions: Repeat 10 times, holding for 5 seconds at the top, and rolling slowly and smoothly through the spine to go up and down.

Back Extension


Benefits: This exercise strengthens the upper back and reverses the forward rounding posture common to everyday activities.

Set-up: Lie on your chest, bring your legs together, and extend your arms out to the side with your palms facing down.

Movement: Pull your bellybutton up and into your spine and keep it there to protect your lower back. Press your hands into the floor, and lift your face, neck, and upper back slightly off the floor. Lift your hands off the floor. Focus on engaging your upper middle back, and keeping your abdominals engaged. Keep the chin tucked so that your neck is in line with your spine.

Modifications: If this bothers your lower back, try pulling your belly button in more deeply and open the legs slightly apart. To make the exercise more challenging, add holding a light weight in both hands.

Repetitions: Hold position for 4 seconds. Repeat 10 times.

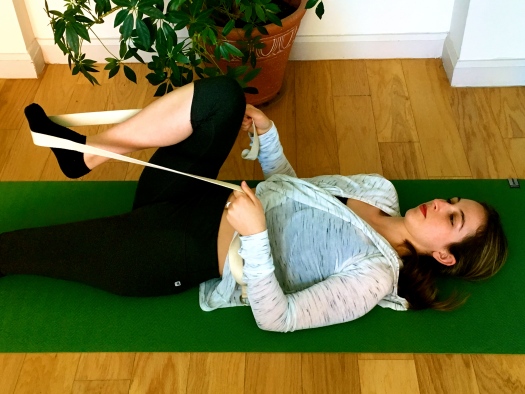
Shoulders/Chest Opener


Benefits: This exercise strengthens the muscles of the upper back and opens the chest, reverses the forward rounding posture common to everyday activities, and opens the front of the shoulders and chest.

Set-up: Stand or sit with feet slightly wider than hip-width distance apart, and clasp your hands behind your back.

Movement: Roll your shoulders up and back. Press your shoulder-blades together and down your back until you feel the front of your chest opening.

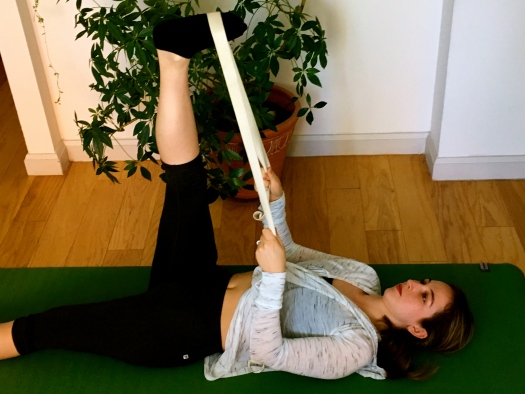
Modifications: Join your palms together if you can. If your shoulders are tight and this is not possible, interlace your fingers, or use a yoga strap.

Repetitions: Hold the position for 10 seconds. Repeat 5 times or throughout the day.

Squats

IMG_1141

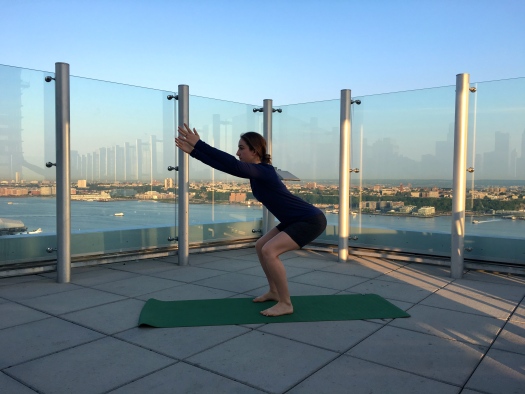
Benefits: This exercise strengthens the muscles responsible for healthy sitting and standing postures.

Set-up: Sit on a chair with hips, knees and feet flexed at a 90-degree angle. Be sure you can comfortably sit with your feet planted on the floor. Your feet should be parallel and hip-width distance apart.

Movement: Lean forward by folding at the hips. Look ahead and slightly upwards, keeping your spine flat. Pull your belly button into your spine, and press your feet into the ground to come up into a standing position. Go through the same movements in reverse to sit back down on the chair. Make sure your knees are tracking over your toes and you are pressing into your feet, engaging the thighs, glutes, and abdominals, and maintaining a straight, neutral spine.

Modifications: If the movement is difficult, reach your arms forward, or use a solid object (e.g., a countertop) to facilitate the movement.

Repetitions: Repeat slowly for 10 times, and mindfully go through these same motions any time you sit down or stand up from the seated position.

Feet Rocks


Benefits: This exercise strengthens your feet and ankles and facilitates healthier postural alignment.

Set-up: Stand with your feet parallel and hip-width distance apart, hold onto a countertop.

Movement: Pull your belly button into your spine, open up your chest, and gently engage your upper middle back. Check to see that your neck is in line with your spine and that your gaze is directly forward. Rock back and forth, shifting your weight backward onto your heels with your toes lifted, then forward onto the balls of your feet with your heels lifted.

Modifications: Make the rocking motion smaller or bigger, depending on what feels more comfortable to you.

Repetitions: Repeat 10 times, back and forth.

This series was originally published in THRIVE: An environmentally conscious lifestyle guide to better health and true wealth by K. Chayne

Morgana Tessler is a Certified Orthopedic Personal Trainer, Yoga, Pilates, Meditation and Barre Instructor based in NYC. Morgana offers private and group fitness sessions. For more information visit www.morgana.nyc FacebookInstagram


Two Minutes to Open Hamstrings

Do you experience tightness and limited range of motion in the backs of your legs? Do you sit a lot for work? Running and cycling can also lead to overly tight hamstrings. Why does it matter? Often tight hamstrings eventually lead to a tight stiff lower back amongst other complaints.

Tight hamstrings can seem impossible to stretch. But with patience and diligence, in just two minutes a day you can make a dramatic difference in your hamstrings range of motion.

IMG_0825
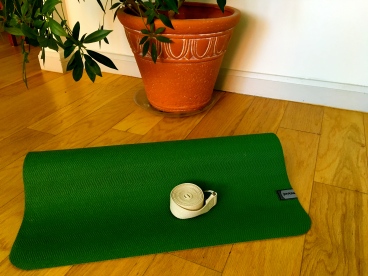
All you need to get started is a yoga strap, two minutes, and something comfortable to lay on such as a yoga mat or blanket.

It is preferable to be warm before stretching. The ideal time being after a cardio workout, which includes walking. If you don’t have time, try doing a few bridges or squats before starting the hamstring stretch. Looking for a full-body workout?

Step 1:

Lay on your back with one leg stretched out on the floor and the other leg bent into your chest with the yoga strap placed onto the ball of your foot. Bring your attention to your lower back. You want to maintain a comfortable neutral spine, which means there is a small pocket of air under your lower back. Imagine a blueberry under your lower back, it is tiny, but you don’t want to squish it. Also be aware of the leg on the floor, you want it to stay straight and long. (As a modification, if you are very tight and getting into this position feels like a strain, bend your straight leg and place the foot on the floor, still be aware of the blueberry).

IMG_0829

Step 2:

Slowly straighten your leg up towards the ceiling being mindful of the “blueberry” from step 1. Hold the straightened position for 5 slow counts, bend and repeat two more times. On the third time straightening the leg, hold the position for 30 seconds to a minute.

IMG_0831

If your leg can’t go all the way straight that is okay. Focus on keeping your thigh over your hip (not letting it lower towards the floor) and gently squeezing the muscles above your knee.

Breathe!

Morgana Tessler is a Certified Orthopedic Personal Trainer, Yoga, Pilates, Meditation and Barre Instructor based in NYC. Morgana offers private and group fitness sessions. For more information visit www.morgana.nyc FacebookInstagram